CANa Display for Nissan LEAF

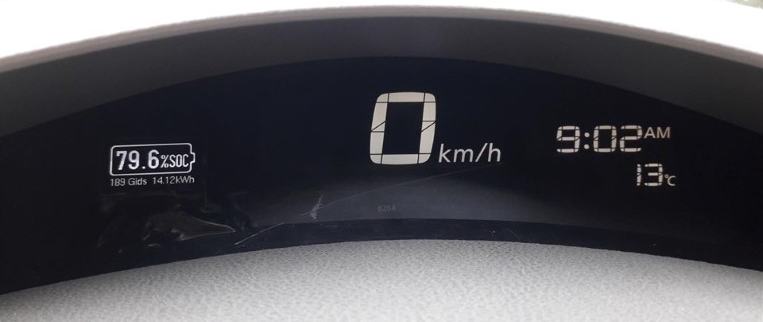
After owning 2011 made Nissan LEAF for a while I can say most annoying thing is that you can't see how much of actual charge is left in the battery. Original Guessometer is very inaccurate driving on hilly roads. Nissan fixed this issue in 2013. But all vehicles made before 2013 was left without proper HV battery charge level meter. One of the solutions is LeafSpy app, which is brilliant, but I got tired of pulling out my phone every time we go on long journeys. That's why I decided to have a play with Arduino and MCP2515 CAN bus board, and make a simple display to display most needed information for me. I made this project open source so you can make it yourself.

First thing you need is to get all hardware. Probably it will cost you about 20 quid and all parts are highly available at most online stores that sells electronic parts.

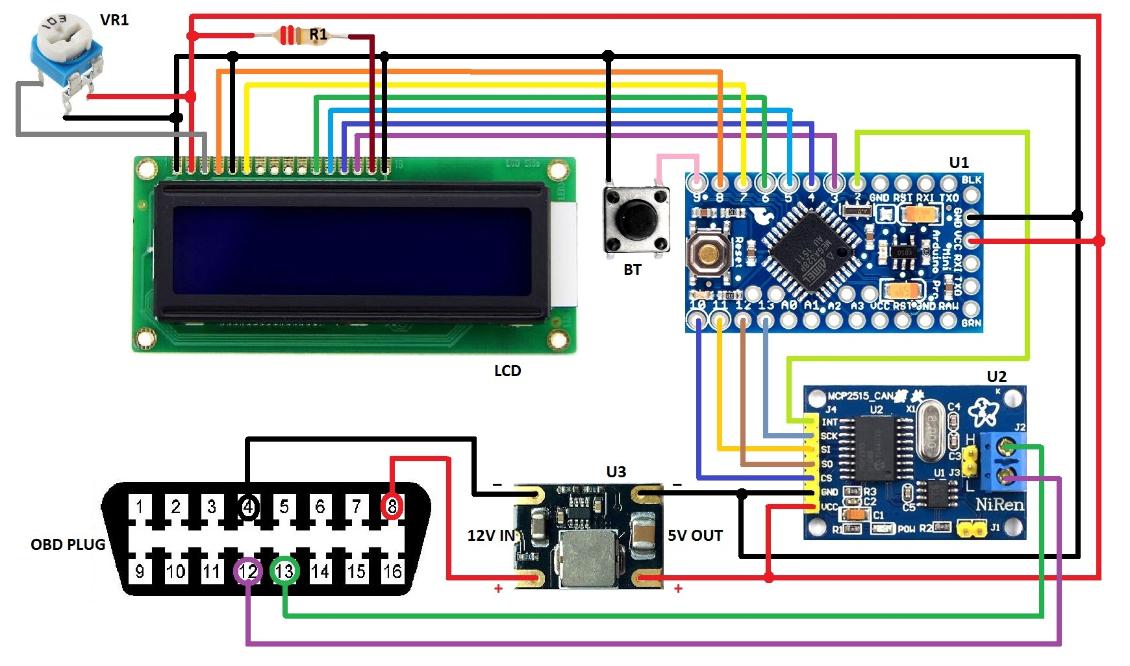
Basic hardware you will need is:
LCD - 2x16 LCD
U1 - Arduino Pro Mini 328    5V/16MHz
U2 - NiRen MCP2515_CAN bus board 8MHz
U3 - Any DC/DC 10..16V to 5V inverter
BT - Momentary push button
R1 - 220 Ohm resistor
VR1 - 10 KOhm variable resistor

Connection diagram:

First screen will display Gids, SOH (HV battery state of health), actual energy left in battery in kWh and SOC (HV battery state of charge in percents). Please note that SOC will differ from charging station readings and vehicle display readings, it's because NISSAN limited battery charging to 95%, which in vehicle is reported as 100%. Also on low side it's limited to 5% (0% shown on display and charging station).

Screen two: main battery voltage, actual current consumption in Amps and Actual energy consumption in kW.

Third screen displays highest and lowest HV battery cell voltages and difference between them two.

Fourth screen displays HV battery temperature readings.

Please note that while on first and second screen, microcontroller is only listening to CAN line without interrupting EV CAN line. While on third and fourth screens Arduino sends some messages to EV CAN requesting battery cell min, max values or temperature readings to be returned. EV CAN line interruption is very critical and should not be used while driving. So if you decide to use third or fourth screen while driving, all responsibility goes to you as you been warned not to do so!

If you will be using Arduino code in ino format you will need to download MCP_CAN_lib-master Arduino library to successfully compile it. Press on the link bellow to download MCP_CAN_lib-master library. In this link you also will find some information how to install this library.

Press here >> MCP_CAN_lib on Github << Press here


I have also included Arduino code in hex format for those who use Xloader to program Arduino.I won't go into details of how to program Arduino as there is loads of tutorials on Youtube, just use these if you never done it before.

Arduino code (current versions):

17/12/2021 - update list for V1.4:
fixed incorrect battery temperature readings when battery temperature drops bellow 0C degrees. 
CANa_Ver1.4.rar CANa_Ver1.4.rar
Size : 12.459 Kb
Type : rar
Previous versions:
CANa_Ver1.3.rar CANa_Ver1.3.rar
Size : 12.347 Kb
Type : rar


Switching between different screens is done by pressing push button. Please check next video of how it works and what it displays on different screens:
I'm also sharing 3D files of LCD enclosure I made for this project. I printed it on my Anycubic Photon 3D resin printer.
LCD box 1.stl LCD box 1.stl
Size : 212.779 Kb
Type : stl
LCD box 2.stl LCD box 2.stl
Size : 7.044 Kb
Type : stl


Links of similar projects and info that helped a lot with my project:
LEAF CAN bus decoding (open discussion)
LeafCANlog project
LeafCAN project
Nissan LEAF CAN message wiki
Active EV-CAN Sampling

Please note that playing with vehicles CAN bus can cause serious damage to your vehicles electronics. I will not take any responsibility for any damage done while using information or code provided in this site as it is for educational purposes only!

Please let me know if you see any mistakes in Arduino code or got suggestions how to make it better.


Other people who built this project or took their project to the next level:

Paul made it look so cool, OLED display fitted inside eyebrow dash. Thanks Paul for sharing your project with us.
Link: http://www.myonlinediary.com/index.php/Energy/SOCDisplay


© Copyright EV-OLUTION