Using original Nissan LEAF Climate Control to control aftermarket heater
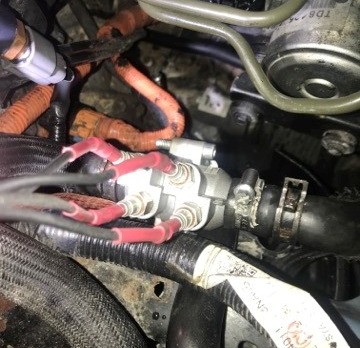
So, another project just kicked in with Nissan LEAF (2011-2012) climate control. As you know early Nissan LEAF PTC heaters sucks. They fail a lot and there is a good reason for this. You can read about this in my other post. So I been involved in a little project to make a controller for aftermarket heater. Toby from MnM Szerviz (Hungary) came with a great idea to use Renault 12V heating element (part number: 8200000677) if original PTC heater has failed. This element perfectly fits to LEAF coolant pipe diameter.
Because there is no easy way to control aftermarket heater using LEAF climate control, I decided to have a play and see if it is possible to do that by using LEAF CAN messages.The idea was to control aftermarket heater without any additional switches, just by using existing data on the EV CAN.
So first thing was to identify few needed parameters on a CAN line, such as state of climate control, interior temperature, exterior temperature, heater coolant fluid temperature and climate control set temperature. After reading other people findings and playing with real data I soon found all needed data:
CAN message ID and byte: 0x54A byte 4
Parameter: Climate control set temperature
Additional note: This data is only correct while climate control is active. If climate control is switched OFF or activated by app, byte 4 reads as 0x00.
Set temperature in Celcius = 0x54A[byte 4] / 2.
For example 16C = 0x20 or 30C = 0x3C.
CAN message ID and byte: 0x54C byte 2
Parameter: Climate control status
Additional note: This data is available all the time when CAN line is active, even if climate control is activated by app.
Data only changes if climate control is activated or deactivated, AC is activated or deactivated, back screen defrost is activated or deactivated.
What I found is that, activating different things, data changes by doing simple bits add. Although AC only changes data for a limited time, then data goes back to previous state.
So when everything is switched OFF: 0x00.
When back screen defrost is switched ON: + 0x2*.
When climate control is switched ON: + 0x4*.
When AC is switched ON: + 0x8*.
For example back screen heating is ON but climate control is OFF: 0x20.
Back screen heating is OFF, climate control is ON, AC OFF: 0x40.
Back screen heating is ON, climate control is ON, AC OFF: 0x60.
Back screen heating is ON, climate control is ON, AC ON: 0xE0.
Hope you get the idea.
CAN message ID and byte: 0x54C byte 6
Parameter: Outside temperature
Additional note: This data is available all the time when CAN line is active, even if climate control is activated by app.
Outside temperature in Celcius = ( 0x54C[byte 6] / 2 ) - 41.
For example -40C = 0x02 or 32C = 0x92.
CAN message ID and byte: 0x54F byte 7
Parameter: Coolant temperature
Additional note: This data is available all the time when CAN line is active, even if climate control is activated by app. PLEASE NOTE that corresponding temperature is just my guess, I tried to measure it with additional thermometer and compare it with data on CAN line.
Coolant temperature in Celcius = 0x54F[byte 7] - 30.
For example -29C = 0x01 or 97C = 0x7F.
0x7F is a maximum readings, it won't change after that even if temperature is still rising.
CAN message ID and byte: 0x54F byte 0
Parameter: Interior temperature
Additional note: This data is available all the time when CAN line is active, even if climate control is activated by app.
Interior temperature in Celcius = ( 0x54F[0] / 2 ) - 10.
For example 13C = 0x2E or 20C = 0x3C.
After finding all that data I made Arduino based heater controller prototype which is in the test stage right now.
So here is how my controller prototype is built:
U1 - Arduino Pro Mini 328 5V/16MHz
U2 - NiRen MCP2515_CAN bus board 8MHz
U3 - Any DC/DC 10..16V to 5V inverter
Relay shield for Arduino, 5V
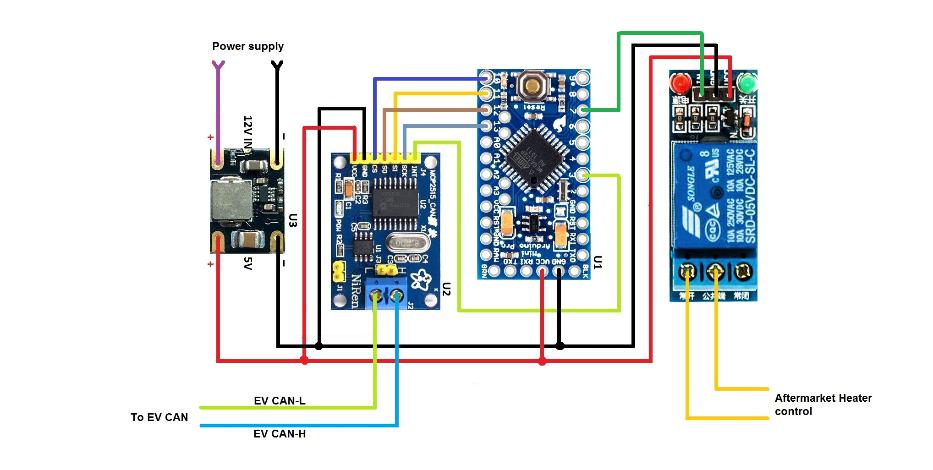
As you see it's very simple diagram and only involves connecting few wires to vehicles wiring loom. Power supply must be connected as shown in two pictures bellow to make it usable while you activate your heater by using your smartphone and Nissan App. If you decide you want to mount controller inside vehicle, go for a connection as shown in first picture. If you want it to be mounted under bonnet, then you can connect it as shown in second picture.
If mounted inside:
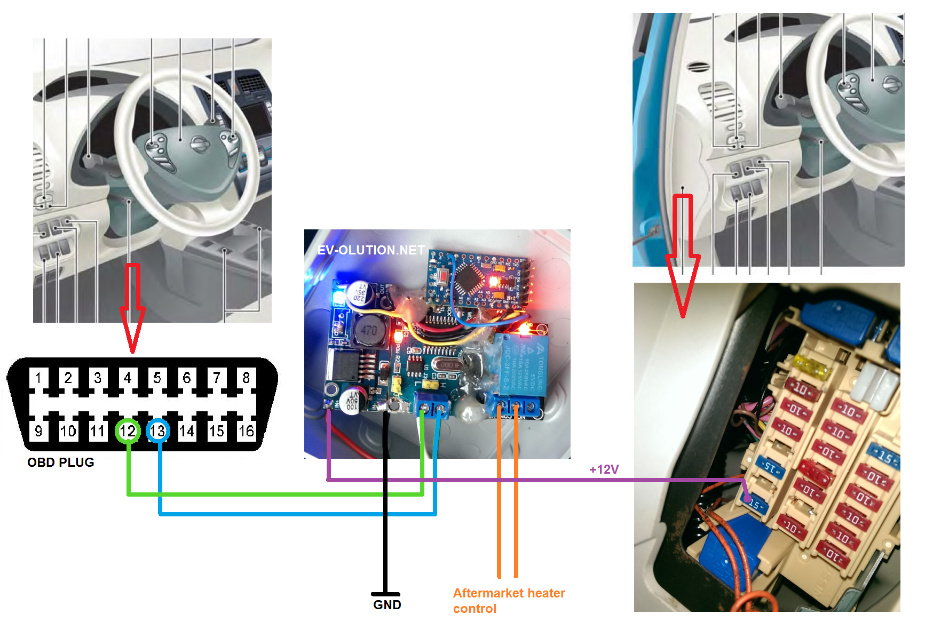
If mounted under bonnet use next example. Wire colors in this picture corresponds to real wire colors on vehicle wiring loom (only for vehicles made 2011-2012). Press on picture to enlarge it:

Don't forget to use a fuse on power supply wire (not shown in my pictures). Also you must use a twisted pair for CAN line. It's just basically two together twisted wires. I will not go into details why this must be done, just use google if you want to learn why this is important. And as all my other projects, this is for educational purposes only. If you decide you want to build and use it, all blame goes on you if something bad happens.
Ok, now lets go to a code for Arduino. This is just an example and must be altered for individual needs. Logics of controller code is:
If LEAF Climate Control is switched OFF or set temperature is 16C, then relay is inactive.
If Climate Control is switched ON and set temperature is 30C, then relay is active all the time unless coolant temperature reached 70C.
Relay is activated if all next conditions are met:
*if Climate Control is switched ON;
*if INTERNAL temperature is lower than SET temperature;
* if SET temperature is at least 2C higher than OUTSIDE temperature;
* if SET temperature is higher than 16C;
* if system is not in cooling state.
System cooling state is activated (relay deactivated) if coolant temperature reached 70C or interior temperature became 2C higher than set temperature.
If system cooling state was activated relay will only be activated again if all next conditions are met:
* if Climate Control is still activated;
* if coolant temperature dropped to 55C or less;
* if interior temperature became equal or less than set temperature;
* if set temperature is still higher than 16C;
* if set temperature is more than outside temperature.
If outside temperature becomes equal or higher than set temperature and set temperature is not equal 30C, relay will be deactivated.
Set temperature is saved in Arduino internal EEPROM all the time you alter it. So if you activate Climate Control by App, set temperature will be exactly same as you left it earlier. So for example if you want it to preheat your vehicle to the +17C next morning, you must set this temperature on your Climate Control before leaving vehicle.
As I already said this code is just an example and must be edited before use to meet personal needs.
To successfully compile Arduino code you will need to download MCP_CAN_lib-master Arduino library. Press on the link bellow to download MCP_CAN_lib-master library. In this link you also will find some information how to install this library.
Press here >> MCP_CAN_lib on Github << Press here
Arduino file for controller:

|
Nissan Leaf CAN heater controller.rar Size : 4.72 Kb Type : rar |
© Copyright EV-OLUTION