Adding ESP8266 to DIY Arduino EVSE/Charging point and using HiveMQ MQTT Broker
This is a second ESP8266 update to my already existing DIY Arduino based EVSE project. If you haven't heard about it, please visit DIY Arduino based EVSE project first. This update allows theuser to monitor and control your DIY EVSE over the internet, and also protect it from unauthorized use. This is done by using cheap Lolin V3 board (ESP8266 based), HiveMQ MQTT Broker and a "MQTT Push Client" App for Android smartphones. Previously I used MaQiaTTo broker. But now most of the time MaQiaTTo is down and not working. So that's why I decided to do the update. Although it's very straight forward project, it still requires some knowledge of how to setup everything properly. Previously I made a quick video of how to setup everything for MaQiaTTo. You can still watch it how to setup your ESP8266 board. You can stop watching as soon as I show how to register with MaQiaTTo broker, as this time we will use HiveMQ broker.
http://www.youtube.com/embed/3gsv9lBetgs .
ESP8266 firmware is open source, so you can modify it in Arduino IDE. Make sure you update your Arduino IDE with ESP8266 library which you can find here > https://github.com/esp8266/Arduino . Otherwise you will get errors while trying to compile it. How to update it easy way, I showed in my video.
Below you can find two files. One is for your Pro Mini board (free version), another for Lolin V3 board. Pro Mini board must be programmed using Xloader. Lolin board must be programmed using Arduino IDE. If you've bought DIY EVSE PCB from us, then use Pro mini files from > here <.
Lolin V3 (ESP8266) board firmware:

|
mqtt_esp8266_HiveMQ.ino.rar Size : 5.064 Kb Type : rar |
Pro Mini board firmware (beta version):
|
|
DIY_EVSE_V1.0C_wdt-on_SERIAL.rar Size : 13.325 Kb Type : rar |
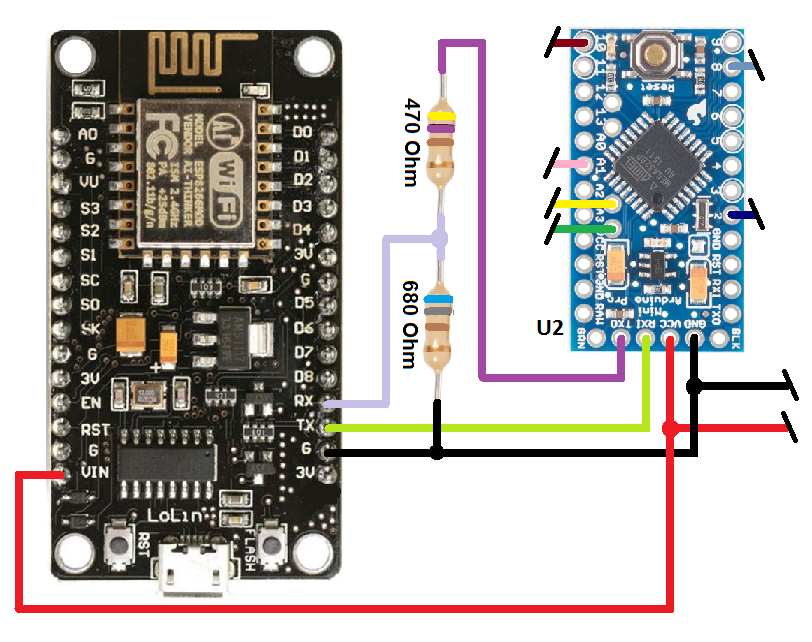
Please note that there are a lot of new very badly designed LoLin V3 boards, which will not work with the diagram showed above. Please see image below how to identify if your LoLin board is good quality/design.

Because this project is completely free and made to be used only for personal needs, I did some limitations to make sure it would be less attractive for people who try to use such projects for gaining profit. There are some delays implemented on serial communication in Pro mini firmware.
After you prepared your ESP8266 board to be programmed, first thing you need to do is to register an account with HiveMQ.

Once you've registered with HiveMQ and logged into your account, create new Cluster. Add new user name and password. Please remember the password as you will need it later while setting up ESP board.

Open ESP firmware which you've downloaded previously from this page. You need to change some data in a code before uploading it to your ESP8266 board. Make sure you choose correct board settings before trying to do anything else.

You need to change Wifi hotspot name and password to your existing one in ESP code. Then you need to copy MQTT broker link (hostname), username and key (password) from your HiveMQ Cluster details page.


If you need to use static IP for your internet access, please uncomment the following lines in ESP code and change the ip, gateway, subnet and dns address to your needed ones:

Now you can compile and upload your firmware to LoLin board. If everything was done correctly you will see flashing LED on LoLin board as soon as you power it. If LED stops flashing, that means there is something wrong with your settings and you must check them carefully again.
Once your LoLin board is up and running we need to setup MQTT Push Client App. First of all you need to download and install it on your smartphone or tablet. Then you need to configure MQTT server settings. You must copy all needed settings from HiveMQ Cluster page:


Save settings and press on MQTT TOPICS to add all needed topics. Bellow you will see example of how you need to setup one of the topics. All other topics must be done in same manner. See the third picture bellow with all needed topics list.


Once you've done with adding topics and saving settings, you should see "Server online" message. Press on your newly setup server. You should see a lot of incoming messages. Now press square symbol on top which will take you to dashboard window.


Now we need to add some text gauges, buttons and slider. Lets start with a text gauges. Just set all the settings as shown in the pictures bellow.


Next step is to add aSlider, which allows you to change max set current over internet when EVSE is not charging or in Block mode. Please note that this option only available for Arduino boards which are using V3 or later EVSE firmware. There is slight delay before max set current settings are updated. This was done for copyright issues and will not be changed even if requested.


Now add some Buttons. Block and Stop Charging buttons only work with V3 EVSE firmware.


Once you've configured all dashboard buttons and gauges your screen should look something like in the picture bellow and it should be displaying real time EVSE data.

I hope this guide was clear enough and easy to follow. If you're getting some issues with setting up your ESP board, please drop us a message.
© Copyright EV-OLUTION